A large roof box is an invaluable accessory for adventurers, families, and anyone needing extra cargo space. It effortlessly expands your vehicle’s capacity for road trips, camping gear, or seasonal equipment. However, once the adventure ends, storing this bulky item can present a significant challenge, especially in a garage where space is often at a premium. Finding a safe, secure, and space-efficient storage solution is key to protecting your investment and maintaining an organized home. This comprehensive guide will walk you through the best methods, preparation steps, and safety precautions to store your large roof box effectively in your garage, ensuring it remains in pristine condition for years to come.
Why Proper Roof Box Storage is Essential
Properly storing your roof box when it’s not in use is more than just about decluttering your garage; it’s fundamental to preserving its quality, functionality, and ensuring you get the most out of your investment. Leaving a roof box on your vehicle when not needed can impact fuel efficiency due to increased drag, making it a costly oversight.
Storing your roof box indoors, specifically in a garage, protects it from harsh weather elements like relentless sun, heavy rain, or freezing temperatures. Exposure to UV rays can cause the material to fade and warp, while extreme cold can make it brittle and prone to cracking. A garage also shields it from potential physical damage, dust, dirt, and even theft, safeguarding your valuable gear. By utilizing smart storage solutions, you reclaim precious floor space, transforming a cluttered area into a functional and organized environment.
Preparing Your Roof Box for Safe Storage
Before you stow away your roof box, a little preparation goes a long way in preserving its condition and ensuring it’s ready for its next adventure. A clean and well-maintained box will last longer and perform better.
Thorough Cleaning and Inspection
|
Our Picks for the Best Roof Box in 2026
As an Amazon Associate I earn from qualifying purchases.
|
||
| Num | Product | Action |
|---|---|---|
| 1 | Asinking Car Rooftop Cargo Carrier Bag - 100% Waterproof Heavy Duty Car Roof Luggage Carrier 21 Cubic Feet, Fits All Vehicles with/Without Roof Rack - Easy Install & Triply Reinforced for Secure Use |

|
| 2 | GarveeLife 46" x 36" Universal Roof Rack Cargo Carrier Basket, 200 Lbs Capacity Rooftop Cargo Rack, Car Top Luggage Holder Basket Heavy Duty for SUVs, Trucks, Vehicles |
|
| 3 | Sailnovo Rooftop Cargo Carrier Roof Bag, 20 Cubic feet Waterproof Roof Cargo Carrier fit car with/Without Luggage Rack - Vehicle Soft Shell Roof Cargo Box with Tie-Down Strap, Safety Hook |
|
| 4 | FIVKLEMNZ 21 Cubic Car Rooftop Cargo Carrier Roof Bag Waterproof for All Top of Vehicle with/Without Rack Includes Topper Anti-Slip Mat + Reinforced Straps + 6 Door Hooks + Luggage Lock |
|
| 5 | Car Rooftop Cargo Carrier Bag, 21 Cubic Feet 100% Waterproof Heavy Duty 840D Car Roof Bag for All Vehicle with/Without Racks - Anti-Slip Mat, 6 Door Hooks, Storage Bags, 2 Extra Straps, Luggage Lock |
|
| 6 | iBirdie Roof Rack Cargo Carrier 15.3 Cubic Feet, Soft-Shell Rooftop Cargo Box, Waterproof Heavy Duty 1200D for Car with/Without Roof Rack, Includes Anti-Slip Mat, Door Hooks, 46x34x17 inches |
|
| 7 | MIDABAO 20 Cubic Waterproof Duty Car Roof Top Carrier-Car Cargo Roof Top Bag, Waterproof & Coated Zippers includes Anti Slip Mat with or without Racks (20 Cubic Feet) |
|
| 8 | Pelican Cargo Cases |
|
| 9 | MeeFar Roof Rack Carrier Basket Universal Rooftop 51" X 36" X 5" + Waterproof Bag 15 Cubic Feet (44" 34" 17"), and Cargo Net with Attachment Hooks, Ratchet Straps |
|
| 10 | iBirdie Roof Rack Cargo Carrier 32.1 Cubic Feet, XXL Soft-Shell Rooftop Cargo Box, Waterproof Heavy Duty 1200D for Car with/Without Roof Rack, Includes Anti-Slip Mat, Door Hooks, 60x37x25 inches |
|
Start by giving your roof box a comprehensive clean, both inside and out. Use mild soap and water to remove any dirt, road grime, insects, or debris that may have accumulated during use. Pay attention to crevices and seals, as these can harbor dirt and moisture. After washing, ensure the box is thoroughly dried to prevent mildew or mold growth, especially if using a protective cover. Once clean, conduct a meticulous inspection for any signs of damage, wear, or tear. Check that hinges, clasps, and locks are functioning smoothly. If any components feel stiff, a light spray of penetrating fluid or lubricant can ensure they operate flawlessly for future use.
Protecting Your Investment
Empty all contents from the roof box before storage. This prevents unwanted odors, moisture buildup from forgotten items, or damage to the box’s interior. To further protect the exterior from scratches, dust, and potential impacts during storage, consider using a waterproof protective cover or a simple tarp. Ensure the cover is securely fastened. For humid environments, placing silica gel packs or other moisture absorbers inside the box can help maintain a dry internal environment, preventing moisture-related damage. “A well-prepared roof box is a long-lasting roof box,” says Alex Thorne, an automotive accessories specialist. “Neglecting basic cleaning and inspection before storage is a common mistake that can significantly shorten its lifespan.”
Choosing the Right Garage Storage Method
The ideal storage method for your large roof box depends largely on your garage’s layout, available space, and personal preference. The goal is to maximize space while ensuring accessibility and safety.
Wall-Mounted Solutions
Wall-mounted solutions are excellent for reclaiming floor space, especially in garages with ample wall area. This method typically stores the roof box vertically or horizontally against a wall.
Wall-mounted systems are particularly beneficial for narrow garages or when you need the floor clear for parking vehicles or other activities. You can use heavy-duty J-hooks, specialized roof box brackets, or even custom-built shelving. When installing, always ensure the brackets or hooks are securely mounted into wall studs to support the substantial weight of a large roof box. Using multiple mounting points will distribute the weight evenly and provide greater stability. Wall-mounted racks often feature padding to protect the roof box from scratches or dents where it makes contact with the support.
 Wall-mounted large roof box in a clean garage with tools organized on a pegboard.
Ceiling-Mounted Systems
Ceiling-mounted solutions are arguably the most space-efficient for large, bulky items like roof boxes, as they utilize often-unused overhead space. These systems keep your roof box completely out of the way, freeing up both wall and floor space.
Hoist Systems: These typically involve a series of pulleys and ropes, allowing you to manually lift and lower the roof box with relative ease. Some advanced systems feature crank mechanisms or even electric hoists for effortless operation. Hoist systems are versatile and can be adapted for various roof box sizes. “Overhead storage, particularly with a well-designed hoist system, is a major upgrade for large items,” states Maria Rodriguez, a garage organization expert. “It’s about making your garage work smarter, not harder.”
Overhead Racks/Platforms: These are fixed structures mounted to the ceiling joists, creating a sturdy platform where the roof box can be placed. While they don’t offer the easy lift-and-lower functionality of a hoist, they provide a very stable storage option once the box is in place.
When installing any ceiling-mounted system, identifying and securely attaching to ceiling joists is paramount. The system must be capable of supporting the full weight of your roof box, plus a significant safety margin. Many systems are designed for one-person operation, but initially, a second pair of hands can be helpful for safety during installation and initial lifts.
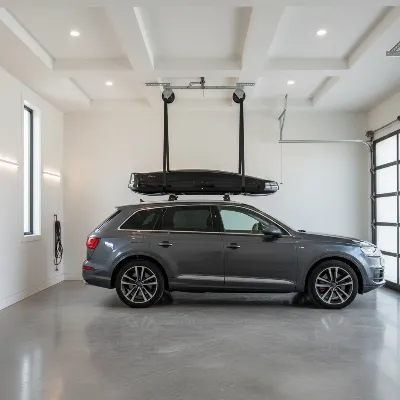 Ceiling hoist system storing a large roof box above a parked car in a garage.
Floor-Based Storage
While generally not recommended for large roof boxes due to space consumption and potential for damage, floor-based storage may be a temporary or last-resort option. If storing on the floor, never place the roof box directly on cold, hard concrete. This can cause the material to become brittle or warp over time. Instead, elevate it using a couple of wooden planks or a sturdy pallet. Always place a protective sheet or blanket underneath. Avoid leaning the roof box against a wall, as it can be unstable and prone to falling, leading to damage or injury. Position it in a low-traffic area to minimize the risk of accidental impacts from vehicles, bicycles, or other garage activities.
Step-by-Step Guide: Installing a Ceiling Hoist System
A ceiling hoist system is an excellent DIY project that can significantly improve your garage’s storage capacity. Here’s a general guide to installing one, often adaptable from bicycle hoist kits.
- Assess Your Garage Ceiling: Before purchasing materials, inspect your garage ceiling. Identify the direction of the ceiling joists, as these are the structural supports you’ll need to mount into. Measure the available height and length to ensure the hoisted roof box won’t interfere with garage door operation or vehicle clearance. Most standard bike hoist kits can be adapted for roof boxes, but consider the roof box’s dimensions.
- Gather Materials and Tools: You’ll need a heavy-duty hoist kit (often marketed for bikes or kayaks, rated for at least 100-150 lbs), strong rope, possibly some wooden planks for a platform (recommended for large, flexible roof boxes to prevent warping), lag bolts, a drill, a stud finder, a tape measure, and a ladder. For a more robust solution, consider a wider platform or two separate hoists.
- Mount the Brackets/Pulleys: Following the hoist kit’s instructions, use a stud finder to locate the ceiling joists. Mark the drilling points. Mount the main pulley brackets securely into the joists using appropriate lag bolts. Ensure they are aligned correctly to allow for smooth operation. If your joists run perpendicular to your desired roof box orientation, you might need to first mount a sturdy wooden beam (e.g., a 2×6) across several joists, then attach the hoist brackets to this beam.
- Construct a Lifting Platform (Optional but Recommended): For large roof boxes, especially those made of more flexible plastic, creating a simple wooden platform can provide better support and prevent the box from deforming when suspended. Cut two pieces of wood (e.g., 1×3 or 2×4 pine) slightly shorter than the width of your roof box, and drill holes near the ends to thread the hoist straps/ropes. These planks will cradle the box. Alternatively, some DIY hoists use a larger plywood platform.
- Rig the Rope and Straps: Thread the heavy-duty rope through the pulleys as per the hoist kit’s instructions. Attach the lifting straps to your platform planks (if used) or directly around the strong points of your roof box. Ensure the rope and straps are long enough for the roof box to be lowered to a comfortable height for loading and unloading. Tie secure knots, such as a double overhand or an Alpine butterfly knot, to prevent slippage.
- Attach and Hoist the Roof Box: Carefully place your empty roof box onto the straps or platform. Double-check that it is balanced and securely fastened. Begin to slowly hoist the box, ensuring it moves smoothly and remains level. Raise it until it is close to the ceiling, clear of any obstructions.
- Test the System: Before leaving it indefinitely, thoroughly test the hoist system with the roof box. Lift and lower it several times, checking for any signs of strain, slippage, or instability. Confirm all knots are tight and hardware is secure.
Important Safety and Maintenance Tips for Stored Roof Boxes
Storing your roof box safely extends beyond just putting it away; it involves ongoing vigilance and care. Adhering to these tips ensures both the longevity of your roof box and the safety of your garage environment.
Always ensure your roof box is securely mounted, whether on a wall or from the ceiling, to prevent accidental falls. Loose fastenings or an overloaded system can lead to severe damage to the box or, more critically, injury to anyone nearby. It’s crucial to adhere strictly to the weight limits specified by the manufacturer for both the roof box itself and any storage system you install. Periodically, perhaps every few months, check the entire storage setup. Inspect the mounting hardware for any signs of loosening, corrosion, or wear. Examine the roof box for cracks, deformation, or pest intrusion.
While in storage, your roof box should ideally be kept in a cool, dry area of your garage, away from direct sunlight and extreme temperature fluctuations. Consistent temperatures help preserve the plastic and other materials. “Just like any specialized equipment, a roof box benefits from regular attention, even when it’s not in use,” advises David Chen, an experienced automotive technician. “A quick inspection can prevent minor issues from becoming costly repairs.” Finally, if storing on the floor, even temporarily, never lean the box precariously against a wall, as this significantly increases the risk of it toppling over.
Conclusion
Storing a large roof box safely in your garage is a smart investment in its longevity and an effective way to maximize your available space. By thoroughly cleaning and inspecting your roof box before storage, you ensure it remains in top condition. Choosing the right storage method—whether a space-saving wall-mounted system or an overhead hoist that frees up valuable floor space—is crucial for both convenience and protection. With proper installation, adherence to weight limits, and routine maintenance, your roof box will be ready for many more adventures, providing reliable extra cargo capacity whenever you need it. Which garage storage solution best fits your lifestyle and space?
Frequently Asked Questions
Is it okay to store a roof box vertically?
Yes, storing a roof box vertically can be an excellent way to save garage floor space, especially for narrower boxes. Ensure it’s securely supported by robust wall-mounted brackets or a specialized stand to prevent it from tipping over and to distribute its weight evenly, protecting the material from warping or strain.
What are the best ways to protect my roof box during storage?
To best protect your roof box, thoroughly clean and dry it, then cover it with a breathable, waterproof protective cover or a large sheet to shield it from dust, scratches, and UV light. For added protection in humid environments, place silica gel packs inside to absorb moisture.
Can a roof box be stored outside the garage?
While possible, it is generally not recommended to store a roof box outdoors. Exposure to direct sunlight, extreme temperatures, rain, and snow can cause the plastic to fade, warp, become brittle, and significantly shorten its lifespan. A garage offers the ideal protected environment.
How much weight can a garage roof box hoist typically hold?
Most garage hoist systems designed for roof boxes, bikes, or kayaks typically have a weight capacity ranging from 100 to 150 pounds (45 to 68 kg). Always check the specific manufacturer’s rating for your hoist to ensure it can safely support your roof box.
Should I remove all accessories before storing the roof box?
Yes, it’s best practice to remove any detachable accessories, such as roof bar clamps or internal cargo straps, from the roof box before storage. This minimizes clutter, allows for thorough cleaning, and prevents accessories from rattling around or causing wear on the interior during storage.