Discovering a crack in your hard shell roof box can be disheartening, especially if you rely on it for extra storage during your adventures. A damaged roof box not only compromises its waterproof capabilities but also poses a safety risk, potentially leading to further damage or loss of contents while driving. Fortunately, with the right approach and materials, many cracks can be effectively repaired, extending the life of your valuable gear. This guide, drawing on extensive experience with various roof boxes, will walk you through the process of mending a cracked hard shell roof box safely and securely, helping you make informed decisions to keep your equipment in top condition.
Understanding Your Roof Box and Why Cracks Happen
A hard shell roof box, typically made from ABS plastic, fiberglass, or a combination of robust polymers, is designed to provide secure, weather-resistant storage atop your vehicle. These durable containers are invaluable for road trips, camping, and transporting oversized gear like skis or strollers, freeing up crucial space inside your car.
However, even the toughest materials have their limits, and roof boxes are susceptible to various forms of damage. Common culprits include impacts from low-hanging branches, garage ceilings, or road debris. Overloading the box beyond its recommended weight capacity or unevenly distributing contents can also place undue stress on its structure, leading to stress cracks, especially near hinges or mounting points. Prolonged exposure to harsh UV rays and extreme temperatures can degrade the plastic over time, making it brittle and prone to cracking. Addressing these cracks promptly is crucial; a minor fissure can quickly escalate into a significant structural issue, jeopardizing your belongings and potentially creating hazardous driving conditions.
Essential Tools and Materials for a Durable Repair
A successful roof box crack repair hinges on having the right tools and selecting suitable materials. Preparing these beforehand ensures a smooth and efficient process.
For cleaning and preparation, you will need:
- Alcohol Wipes or Isopropyl Alcohol with clean rags: Essential for degreasing and thoroughly cleaning the repair area, ensuring optimal adhesion.
- 80-grit Sandpaper: Used to rough up the surface around the crack, creating a texture that allows repair materials to bond strongly.
- Utility Knife or Scissors: For cutting fiberglass cloth to size.
- Drill with a small drill bit (e.g., 1/8 inch): (Optional but highly recommended) To drill small holes at the ends of a crack, preventing it from spreading further.
- Propane Torch (optional for epoxy): For a brief flame treatment that can enhance epoxy adhesion on certain plastics.
For the repair materials, the choice often depends on your roof box’s material and the crack’s severity:
- Epoxy Resin Kit with Fiberglass Cloth: This is generally the most robust solution for structural cracks in hard plastic or fiberglass boxes. Products like WEST SYSTEM G/flex epoxy are known for their flexible yet strong bonds, crucial for absorbing vibrations and temperature changes. The fiberglass cloth provides significant reinforcement.
- ABS Cement with Fiberglass Strips: If your roof box is specifically made from ABS plastic (many are, especially older Thule and Yakima models), ABS cement effectively “welds” the plastic together. Combined with fiberglass strips, it creates a very strong, integrated repair.
- Other Adhesives (e.g., JB Weld): For smaller, non-structural hairline cracks or minor chips, a strong two-part epoxy adhesive like JB Weld can provide a good seal and bond. While effective, these may not offer the same structural reinforcement as fiberglass solutions.
Application tools include:
- Mixing Cups and Stir Sticks: For accurately mixing two-part resins and adhesives.
- Plastic Spreaders or Putty Knives: To apply and smooth out resin/cement and lay fiberglass cloth evenly.
- Clamps or Masking Tape: To hold the crack closed during the curing process, ensuring a tight bond.
Finally, safety gear is paramount:
- Gloves: Protect your hands from chemicals and resins.
- Safety Glasses: Shield your eyes from splashes or dust during sanding.
- Respirator: Crucial when working with strong fumes from ABS cement, certain epoxies, or slurries, ensuring you operate in a well-ventilated area.
Having these items ready before you begin will streamline your repair, leading to a safer and more durable fix.
Step-by-Step Guide to Repairing Your Roof Box Crack
Repairing a crack in your hard shell roof box requires careful attention to detail, but it’s a manageable DIY project with the right approach. Follow these steps for a lasting repair.
Preparation is Key: Cleaning and Prepping the Area
|
Our Picks for the Best Roof Box in 2026
As an Amazon Associate I earn from qualifying purchases.
|
||
| Num | Product | Action |
|---|---|---|
| 1 | MeeFar Roof Rack Carrier Basket Universal Rooftop 51" X 36" X 5" + Waterproof Bag 15 Cubic Feet (44" 34" 17"), and Cargo Net with Attachment Hooks, Ratchet Straps |

|
| 2 | iBirdie Roof Rack Cargo Carrier 15.3 Cubic Feet, Soft-Shell Rooftop Cargo Box, Waterproof Heavy Duty 1200D for Car with/Without Roof Rack, Includes Anti-Slip Mat, Door Hooks, 46x34x17 inches |
|
| 3 | FIVKLEMNZ 21 Cubic Car Rooftop Cargo Carrier Roof Bag Waterproof for All Top of Vehicle with/Without Rack Includes Topper Anti-Slip Mat + Reinforced Straps + 6 Door Hooks + Luggage Lock |
|
| 4 | GarveeLife 46" x 36" Universal Roof Rack Cargo Carrier Basket, 200 Lbs Capacity Rooftop Cargo Rack, Car Top Luggage Holder Basket Heavy Duty for SUVs, Trucks, Vehicles |
|
| 5 | MIDABAO 20 Cubic Waterproof Duty Car Roof Top Carrier-Car Cargo Roof Top Bag, Waterproof & Coated Zippers includes Anti Slip Mat with or without Racks (20 Cubic Feet) |
|
| 6 | iBirdie Roof Rack Cargo Carrier 32.1 Cubic Feet, XXL Soft-Shell Rooftop Cargo Box, Waterproof Heavy Duty 1200D for Car with/Without Roof Rack, Includes Anti-Slip Mat, Door Hooks, 60x37x25 inches |
|
| 7 | Car Rooftop Cargo Carrier Bag, 21 Cubic Feet 100% Waterproof Heavy Duty 840D Car Roof Bag for All Vehicle with/Without Racks - Anti-Slip Mat, 6 Door Hooks, Storage Bags, 2 Extra Straps, Luggage Lock |
|
| 8 | Asinking Car Rooftop Cargo Carrier Bag - 100% Waterproof Heavy Duty Car Roof Luggage Carrier 21 Cubic Feet, Fits All Vehicles with/Without Roof Rack - Easy Install & Triply Reinforced for Secure Use |
|
| 9 | Pelican Cargo Cases |
|
| 10 | Sailnovo Rooftop Cargo Carrier Roof Bag, 20 Cubic feet Waterproof Roof Cargo Carrier fit car with/Without Luggage Rack - Vehicle Soft Shell Roof Cargo Box with Tie-Down Strap, Safety Hook |
|
Thorough preparation is the most critical step for a strong and durable repair. A clean, properly prepped surface ensures maximum adhesion for your chosen repair material.
Begin by cleaning the entire area around the crack, both inside and outside the roof box. Use alcohol wipes or isopropyl alcohol on a clean rag to remove all dirt, grease, wax, and grime. Any residue will hinder the bonding process. Once clean, allow the area to dry completely.
Next, sand the surface around the crack using 80-grit sandpaper. This creates a roughened profile that provides mechanical grip for the adhesive. Extend your sanding approximately 5-8 centimeters (2-3 inches) beyond the crack in all directions. For larger cracks, consider sanding a wider area. Wipe away any sanding dust with a clean, dry cloth or alcohol wipe.
To prevent the crack from spreading further, a highly recommended technique is to drill a small hole (e.g., 1/8-inch or 3mm) at each end of the crack. This dissipates the stress concentrated at the crack’s tip, effectively “stopping” its propagation.
(Optional for Epoxy Adhesion): For some hard plastics, a quick flame treatment can dramatically improve epoxy adhesion. Briefly pass the flame of a propane torch over the sanded area, moving at about 30-40 cm per second. The flame oxidizes the surface, making it more receptive to bonding. No visible change should occur; avoid scorching or melting the plastic. Let the surface cool before proceeding.
Applying the Repair Material for Strength
With the surface meticulously prepared, you are ready to apply the chosen repair material. This section focuses on the common and most effective methods: epoxy with fiberglass cloth or ABS cement with fiberglass strips.
For Epoxy Resin with Fiberglass Cloth:
- Mix the epoxy: Refer to your specific epoxy kit’s instructions for mixing ratios. For WEST SYSTEM G/flex, it’s typically a simple 1:1 ratio by volume of resin and hardener. Mix thoroughly in a disposable cup until uniformly blended. If recommended, gently warm the resin and hardener beforehand to reduce viscosity for better penetration.
- Apply epoxy to the crack: Position the roof box so gravity assists the epoxy in flowing into the crack. Use a small brush, mixing stick, or syringe to work the epoxy deep into the fissure. Ensure it fully penetrates the crack. If possible, gently press or clamp the crack closed to achieve a tight bond.
- Prepare fiberglass patches: Cut several pieces of fiberglass cloth, ensuring each piece extends at least 5 cm (2 inches) beyond the crack on all sides. Gradually increase the size of subsequent patches for a staggered, stronger reinforcement.
- Layer the fiberglass: Apply a thin, even layer of mixed epoxy to the prepared area. Lay the first fiberglass patch onto the wet epoxy, smoothing it down with a plastic spreader or brush to remove air bubbles and saturate the cloth. Apply more epoxy over the patch, ensuring it’s fully impregnated and transparent. Repeat this process with additional layers of fiberglass, building up strength. Aim for at least two to three layers for robust reinforcement.
For ABS Cement with Fiberglass Strips (for ABS plastic boxes):
- Prepare the cement: ABS cement is often a single-component product designed to chemically weld ABS plastic. Ensure you are working in a very well-ventilated area and wearing a respirator.
- Apply cement and strips: Apply a generous layer of ABS cement to the sanded area around the crack. Immediately lay a fiberglass strip (often drywall repair tape can work here) onto the wet cement, pressing it firmly into place. Brush more cement over the fiberglass until it is completely saturated and appears translucent.
- Layer for strength: Apply a second layer of ABS cement, followed by another fiberglass strip, ensuring overlap. Repeat to build up sufficient thickness and strength. The cement typically sets quickly, so have your patches cut and ready.
No matter which material you use, ensure the application is as smooth and even as possible to minimize post-curing work.
Curing, Finishing, and Aesthetic Touches
Once the repair material has been applied, the next phase is crucial for achieving its full strength and a neat finish.
Curing: Allow ample time for the repair material to fully cure. This is critical for maximum strength and durability. For epoxy resins like G/flex, this can typically range from 7 to 10 hours, but always follow the manufacturer’s specific instructions. During this time, keep the roof box in a stable environment, ideally at room temperature, and avoid disturbing the repaired area. If you used clamps, ensure they remain in place throughout the initial curing phase.
Sanding Excess Material: After the repair material has completely cured and is hard to the touch, you may notice rough edges or excess material. Gently sand these areas smooth using fine-grit sandpaper (e.g., 120-220 grit), followed by even finer grit if you desire a very smooth finish. The goal is to blend the repair seamlessly with the original surface of the roof box.
Painting and Sealing (Optional): For aesthetic purposes or added protection, you can opt to paint or seal the repaired area. Many roof box materials are susceptible to UV degradation over time, so applying a UV-resistant paint or coating can help protect the repair and the surrounding plastic. Products like Plasti-Dip or specialized outdoor-grade spray paints can work well. If waterproofing is a concern, a liquid rubber waterproof sealant can be applied over the repair for an extra layer of defense, especially effective for filling any remaining small gaps.
“A well-executed repair is often stronger than the original material, especially when using modern epoxy and fiberglass composites. Patience during the curing phase is just as important as the application itself.” – Dr. Eleanor Vance, Materials Science Engineer specializing in Composites
By following these steps, you can achieve a robust, long-lasting repair that restores the integrity and appearance of your hard shell roof box.
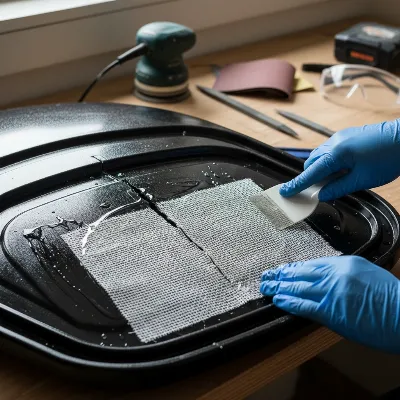 Expert hands applying epoxy resin and fiberglass cloth to a cracked hard shell roof box on a workbench
Post-Repair Care and Maintenance
Once your roof box crack is successfully repaired, ongoing care and maintenance are essential to ensure its longevity and prevent future damage.
Regularly check the repaired area before and after each trip. Look for any signs of stress, new cracks forming, or the repair starting to delaminate. Early detection allows for minor touch-ups before they become major problems.
Always adhere to the manufacturer’s recommended weight capacity for your roof box. Overloading is a common cause of structural stress and can compromise your repair. Distribute the weight evenly inside the box, placing heavier items at the bottom and center to maintain stability and reduce strain on the shell.
When not in use, store your roof box properly. Ideally, keep it in a cool, dry place away from direct sunlight. Prolonged UV exposure can degrade plastic and repair materials over time, leading to brittleness and cracking. If outdoor storage is unavoidable, consider using a protective cover. Regularly cleaning your roof box, both inside and out, will also help remove corrosive elements and maintain its material integrity.
When to Consider Professional Repair or Replacement
While many cracks in hard shell roof boxes are repairable with DIY methods, there are specific situations where seeking professional assistance or considering a complete replacement is the safer and more practical option.
You should consider professional repair if:
- The crack is very large or complex: Long, branching cracks or those with missing pieces of material can be challenging to repair structurally at home.
- Structural integrity is severely compromised: If the crack affects a major load-bearing area, like the base or near the mounting points, a professional might use specialized techniques (e.g., plastic welding, advanced composite repair) to ensure safety.
- Cracks are near hinges or locking mechanisms: These areas experience significant stress, and a faulty DIY repair could lead to operational failure or compromised security.
Replacement is often the best course of action if:
- Multiple, extensive cracks: If the roof box has numerous large cracks, the overall structural integrity might be too weakened for a reliable repair. The cost and effort of repairing multiple extensive damages might exceed the value of a new box.
- Cracks are irreparable: Some materials or types of damage, particularly severe impacts that shatter large sections, may simply be beyond effective repair.
- Age and general wear: If your roof box is very old and shows widespread signs of material fatigue, brittleness, and degradation, even a single repair might only be a temporary fix, with new cracks likely to appear elsewhere.
- Safety concerns: If you have any doubts about the safety of a repaired box, especially if it will be used for long trips or carrying heavy loads, replacing it provides peace of mind. Your safety and the safety of other road users should always be the top priority.
Consulting with an expert or a reputable repair shop can provide a professional assessment and help you make the best decision for your specific situation.
 A hard shell roof box securely mounted on top of a vehicle driving on a highway, with mountains in the background
Conclusion
Repairing a crack in your hard shell roof box is a rewarding project that can significantly extend its lifespan, saving you the expense of a replacement. By diligently following proper preparation techniques, selecting the appropriate repair materials like epoxy and fiberglass, and applying them correctly, you can achieve a strong, durable, and waterproof fix. that attention to detail during cleaning, sanding, and especially during the curing phase, is paramount for a successful outcome. With your renewed roof box, you’re ready for countless more adventures, carrying your gear safely and securely. Have you ever attempted a significant repair on your outdoor gear, and what valuable lessons did you learn from the process?
Frequently Asked Questions
What causes cracks in hard shell roof boxes?
Cracks in hard shell roof boxes are commonly caused by impacts from low obstacles, such as garage entrances or tree branches, overloading the box, or prolonged exposure to harsh UV radiation and extreme temperatures, which can degrade the plastic material over time, making it brittle.
Can I use duct tape for a roof box crack repair?
While duct tape might offer a temporary, superficial fix for very minor leaks, it is not a durable or structural repair solution for a cracked hard shell roof box. For a safe and lasting repair that withstands driving forces and weather, specialized materials like epoxy resin with fiberglass or ABS cement are required.
How long does a DIY roof box repair typically last?
A well-executed DIY repair using appropriate materials like epoxy resin and fiberglass cloth can last for many years, often as long as the remaining lifespan of the roof box itself. The durability depends heavily on the preparation, quality of materials, and ongoing care, including regular inspection.
Is it safe to drive with a repaired roof box?
It is safe to drive with a repaired roof box provided the repair is structural, fully cured, and thoroughly inspected for integrity. Always ensure the repair does not compromise the box’s mounting points or locking mechanisms. If there’s any doubt about the repair’s strength, it’s safer to seek professional advice or consider replacement.
Get our weekly buyer guide
Practical specs, not advice. Unsubscribe anytime.